


4 Steps To Learning How to 'Read' Your Knitting
3 min read time
Hello knitters,
Learning how to ‘read’ your knitting – the ability to understand and identify stitches – is one of the best things a knitter can do to keep knitting enjoyable. Think of knitting on the train or knitting watching TV, you can simply pause your work and get back to it knowing exactly where you last left it!
By getting more familiar with ‘reading’ your knitting you can;
- identify what stitches you’re working;
- understand what you’ve already done;
- know where you’re going next;
- find mistakes and know how to fix them.
Beginner's guide - How to 'read' knitting
1. The basic structure of knitted fabric
Stocking Stitch is the most basic knit fabric. Although most beginners start off with Garter Stitch, when learning to ‘read’ your knitting the flat natured structure of Stocking Stitch with knits on one side and purls on the other will make the process of identifying stitches and understanding structure easier.
If you examine a sample of Stocking Stitch (stretch the fabric) you’ll notice the structure is a series of loops pulled through other loops. This loop structure allows you to ladder a stitch back multiple rows to where a mistake was made and easily fix it without having to undo all your work.
A loop pulled from the back of the work to the front creates a knit stitch. A loop pulled from the front of the work to the back creates a purl stitch.

2. Knit Stitch vs Purl Stitch
Now that you’ve grasped that the structure of knitted fabric is a series of loops pulled through other loops you may start to recognise the similarity between stitches. In fact, the knit stitch and the purl stitch are the exact same stitch worked on opposite sides of the fabric (i.e. the front side of a knit stitch is the same as the back side of a purl stitch and vice versa). In terms of creating the stitches a knit stitch places the ‘bump’ (or top) of the stitch loop that is knit to the back of your work, and a purl stitch brings that bump to the front. Therefore the method of knitting each stitch differs.
The stitches end up looking the same structurally (loop pulled through loop) so that if you were to purl every row you would produce a Garter Stitch pattern just like when you knit every row.
So how do you identify a knit stitch and a purl stitch in your work?
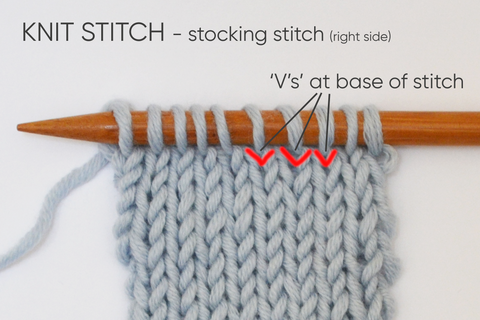
A stitch that has been knitted will have a ‘V’ at its base. A stitch that is purled will have a bump as its base.

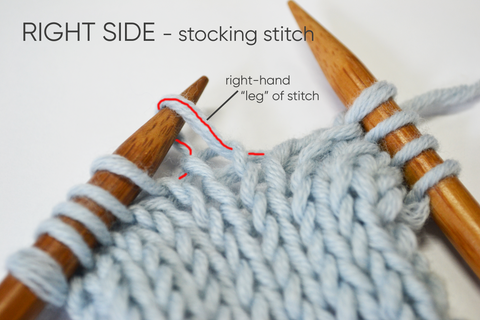
3. How stitches sit on knitting needle
Understanding how stitches sit on your needle means you can put any dropped stitches back on a needle without twisting them. It also means when a pattern asks you to do a slip stitch knitwise or purlwise, the reason, and how it looks physically, will be clearer to you.
Imagine the stitch on your needle has too legs, like someone mounted on horseback with the point of the needle the direction the horse is facing. With the needle in your left hand the right “leg” of the stitch is at the front of the needle, closest to you, while the left “leg” is at the back. If you stretch the stitch out like the below image this becomes more obvious and you can see the direction of the stitch loop and that there is no twist in the stitch.
The stitches on your needle should face this way regardless of whether you’ve done a row of knits or a row of purls.
4. Counting Rows
Counting rows can feel frustrating to start with but learning to count rows will make any knitting project easier.
Garter Stitch
Garter Stitch produces a series of obvious wave-like ridges created by interlocking stitch loops. To count how many rows of knit stitches you’ve done, count the ridges on both sides of your fabric (not including the cast on row) and add them together.

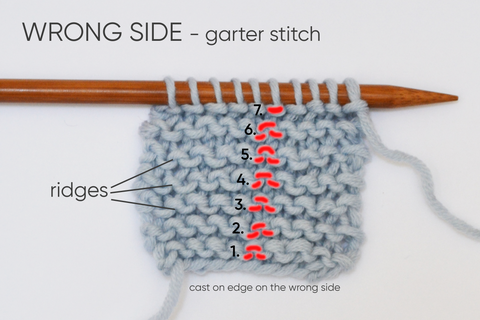
Stocking Stitch
Stocking Stitch’s right side produces rows and columns of ‘V’s’. To count how many rows of knit and purl stitches you’ve done, count every ‘V’ in a column.

If it’s your first time looking at how to ‘read’ your knitting this may feel like a lot of information to take in but don't worry, the more you explore ‘reading’ knitting the easier it will become and the more enjoyment you’ll get from your knitting projects!
Happy knitting!
Stitch samples are knitted on 8mm Bamboo Knitting Needles using Lil’ Merino Wool in Baby Blue.


Handmadebyhafsa - A Story Maker
2 min read time
Craftyparenttools - A Story Maker
2 min read time
Top 5 Granny Square Tips & Tricks
1 min read time
How do I start?
1 min read time
Setting your 2024 Crafting Intentions
3 min read time